Showing posts with label Attitude. Show all posts

10.03.2010

Bitch On Wheels

"Bitch On Wheels"

What you need:
Tube of choice, I used artwork by Elias Chatzoudis
Scrap kit of choice, I used "Biker Babes" Collab by Designs by Sarah & TammyKat Deszigns
Font of choice, I used Haunted Mouse
Graphic Program of choice, I use PSPX2

Let's Begin!

1. Open a new transparent image
Open all of your supplies

2. C/P the round circle frame as a new layer
Add drop shadow
C/P the tire frame
Re-Size as needed
Add drop shadow
C/P the rectangle frame from the kit
Add drop shadow
Trim as needed so the rectangle frame appears to be under the circle frame
And trim the circle frame so it doesn't show in the rectangle frame
Create a new raster layer behind all layers
Using your lasso tool, trace along the circle frame opening
C/P the paper of choice into selection
Repeat this for the rectangle frame

3. C/P the fence of choice behind all layers
Add drop shadow
C/P the chrome flames as a new layer
Rotate 90 degrees to the left
Add drop shadow
C/P the purple skull from kit above the paper in the rectangle frame
Re-Size as needed

4. C/P the full size tube above all layers
Add drop shadow
C/P the head shot tube in the rectangle frame
Trim and re-size as needed
Duplicate
On the bottom layer tube  go to :
Effects>Photo Effects>Film and Filters
Film Looks : Glamour
Creative Filters : None
Filter Color : White
Density : 0
Go to your layer menu on the right side and choose "Overlay"
For the top tube layer, go to Adjust>Blur>Gaussian Blur>Radius 4:00
C/P the word art from the kit and place above tube layers
Using your layer menu again, choose a blend that you like.
I used "Hard Light"
Merge all layers visible
Add copyright info and name and your done!

This tutorial was written on 10.03.10 by Pimp'd Designz at 3:45 PM

1.16.2010

Rebel II


"Rebel II"


What you need:
Tube of choice, I used artwork by Ismeal Rac
Scrapkit, "Teenage Dirtbag II" by Grunge & Glitter
Font of choice, I used Pea Jenna
Graphic Program of choice, I use PSPX2


Let's Begin!


1. Open a new transparent image
Open all of your supplies


2. C/P the double frame from the kit
Rotate 90 degrees to the right
Add drop shadow
Create a new raster layer behind the frame layer
Using your lasso tool, trace along the open area of the frame
C/P the paper of choice into selection
C/P the bike as a new layer above the frame layer
C/P the pink skull as a new layer above the layers
Rotate 6 degrees to the right
Add drop shadow
C/P the guitar above the frame layer
Re-Size as needed
Add drop shadow


3. C/P the mono tone as a new layer behind the paper layer
Re-Size as new layer
Duplicate and drag as shown above
C/P the pink glitter above the mono tone
Duplicate and place as shown
C/P the tube of choice as a new layer above the paper layer
Re-Size as needed & trim
Add drop shadow


Add copyright info & name and you are done!


This tutorial was written on Jan. 16th 2010 at 8:55 PM by Pimp'd Tagz


Bad Girl


"Bad Girl"


What you need:
Tube of choice, I used artwork by Ismeal Rac
Scrapkit of choice, I used "Bad Girl" by me here
Frames of choice, I used "Wing'd Frames" by Me here
Font of choice, I used Emily
Graphic Program of choice, I use PSPX2


Let's Begin!


1. Open a new transparent image
Open all of your supplies


2. C/P the paper back as a new layer
Add drop shadow
C/P the fence element
Add drop shadow
C/P the stamp included in the kit behind all layers

Re-Size as needed

C/P the wing frame of choice
Add drop shadow
Using your selection tool, rectangle, trace along the open area of the frame
Create a new raster layer behind the frame layer
C/P the paper of choice inside the selection
C/P the tube of choice
Trim as needed
Add drop shadow
Add copyright info & name and you are done!


 This tutorial was written on Jan. 16th, 2010 at 12:30 AM by Pimp'd Tagz


1.03.2010

Bad Girl Club


"Bad Girl Club"


What you need:
Tubes of choice, I used artwork by Ismeal Rac
Scrapkit of choice, I used a FTU scrapkit by me here
Font of choice, I used Toonish
Graphic program of choice, I use PSPX2


Let's Begin!


1. Open a new transparent image
Open all of your supplies


2. C/P the frame of choice from the kit
Add drop shadow
Create a new raster layer behind the frame layer
Using your selection tool, Rectangle, Trace along the frame area
C/P the paper of choice INTO the selection on the new raster layer
C/P the fence from the kit behind the paper/frame layer
Add drop shadow
C/P a ribbon of choice above the frame layer
Add drop shadow


3. C/P the tubes of choice and place them similar to above or how you wish
Add drop shadows as needed
Add any text or saying you'd like or the same as above
Add any copyright info and name and you are done!


This tutorial was written on Jan. 3, 2010 by Pimp'd Tagz


12.12.2009

Bad Ass

"Bad Ass"

What you need:
Tube of choice, I used artwork by Ismeal Rac
Scrapkit, Skully by Sarah
Font of choice, I used Impacted
Plug-In : EyeCandy 5 : Texture : Texture Noise
Animation Shop
Paint Program of choice, I use PSPX2

Let's Begin!

1. Open a new transparent image
Open all of your supplies

2. C/P the ribbon frame
Add drop shadow
Create a new raster layer behind the frame layer
C/P the chain link fence element behind the transparent layer
*I made mine B&W using photo edit
Using your magic wand tool, select the open area of the frame
Go to Selection>Modify>Expand>3
Now select the chain link fence layer and cut the fence out of the frame
Now select the transparent image behind the frame layer
C/P the paper of choice INTO selection

3. C/P the tube of choice above the frame layer
Add drop shadow
C/P a close-up of the tube inside the frame, above the paper layer
Trim as needed
Merge the tube and paper layers down together
Add copyright info and name now

*We will now begin the animated portion of this tutorial*

4. Using your magic wand tool, Match Mode : none, Select the tube/paper layer
Go to your EyeCandy plug-in and choose texture noise
Use these settings :
 
Random Speed doesn't matter
Once this is set save as frame 1
Hit the "undo" button and re-do, clicking the random speed button
Repeat this until you have 3 or 4 frames

5. Open animation shop and open your frames into the animation wizard
Set the speed to 25
Press play
If you are happy with the speed, Save and you are done!

This tutorial was written on Dec. 10, 2009 at 8:00 am by Pimp'd Tagz 

11.10.2009

A Little Crazy


"A Little Crazy"


Please click the tag to view at 100%


What you need:
Tube of choice, I used artwork by Ismeal Rac
Tag Template # 268 By Missy 
Font of choice I used Toonish
Plug-Ins Used :
EyeCandy 5 Impact : Gradient Glow
Xenofex2 : Constellation
Xenofex2 : Lightning
Mask 17 by Becky or other mask of choice


Let's Begin!


1. Open a new transparent image
Open all of your supplies


2. Change the colors of the template to fit your tag
Add texture if you wish by going to the following setting:
Effects>Textures>Blinds>Width 3 >Color of choice>Opacity>43
Apply Constellation to each layer of your template
Settings I used are :
Star Size : 2
Size Variation : 9
Edge Star Density : 19
Overall Star Density : 8
Overdrive : 100%
Twinkle Amount : 75%
C/P each layer to your transparent image
Arrange as needed


3. It's best to use a tube that has a close-up image
C/P the large circle as a new selection to your close-up tube
Crop to selection and paste over the circle 
Duplicate tube
For the top layer, apply Gaussian Blur > 3
For the bottom layer make it B&W
Lower the Opacity of the top layer to your liking
C/P the 2nd tube of choice as a new layer
Duplicate
Apply Gaussian Blur again with the same settings to the top layer tube
Apply "Luminance" to the bottom layer in your blend drop down menu


4. Go to your the second half of the oval center template
Go to Xenofex : Lightning 
Settings I used :
Arc : 16
Jaggedness : 92
Branching : 90
Branch Speed : 32
Click the Glow Tab and use this setting :
Flash Size : 2
Be sure to move the circle to where it overhangs the right oval half

This will prevent it from showing in the center of the tag


5. Apply mask to flood fill image of color of your choice
C/P behind all tag layers
Re-Size as needed
Merge All layers visible
Type name
Create a new raster layer behind the text
Merge text layer down to raster layer
Rotate 90 degrees to the left
Go to your gradient glow in EyeCandy 5
 

Above are the settings I used
Merge all layers visible and Add copyright info


You are done! This tutorial was written on Nov. 10, 2009 at 8:18 PM by Pimp'd Tagz

10.10.2009

Who's the bitch???


"Who's the bitch?"


What you need:
Tube of choice, I used artwork by Ismeal Rac
Scrapkit of choice, I used "Im the shhh" by me here
Tag Template # 91 by Yvette here
Font of choice, I used Toonish
Graphic program of choice, I use PSPX2


1. Open a transparent image
Open all of your supplies


2. For each layer of the template you will need to c/p as a new selection
onto the paper of choice. Promote background layer and cut to selection
Then Copy to the transparent image
Add drop shadow as needed


3. C/P the tube of choice
I made mine B&W using photo edit
Add drop shadow
Add copyright & name and you are done!


This tutorial was written October 9th, 2009 at 8:10 PM by Pimp'd Tagz 

9.22.2009

Guitar Hero


"Guitar Hero"


What you need:


Tube of choice, I used artwork by Ismeal Rac
Scrapkit of choice, I used "Dirty Rockstar" by Babycakes  
Font of choice, I used "Toonish"
Graphic program of choice, I use PSPX2
Frame of choice, or use this one here 
(Just right click & save as a PNG)


Let's Begin!


1. Open a new transparent image 
Open all of your supplies


2. C/P the frame of choice
Add drop shadow
C/P the tube of choice
*I used one, but you could use different ones*
Add a head shot of the tube into the frame areas
*I made some B&W using photo edit


3. C/P the rivet ribbon and rotate 90 degrees
Add drop shadow
C/P the swirl 
Duplicate, mirror & flip
Add drop shadow to each
*Again, I made mine black using photo edit
C/P the banner 
Add drop shadow
*Again, using photo edit to make it black
Trace along the open area of the frame
C/P the paper of choice into selection
Behind the frame and tube layers
Merge all layers visible
Add copyright info and name and you are done!


This tutorial was written on Sept. 22, 2009 at 4:45 PM by Pimp'd Tagz


9.17.2009

Bad Ass Woman


"Bad Ass Woman"

What you need:

Tube of choice, I used artwork by Elias Chatzoudis
Scrap kit of choice, I used "Chaotic" by Designs by Helly
 Frame of choice or this one, here 
Font of choice, I used TXT SchoodleRock Bold
Graphic Program of choice, I use PSPX2

Let's begin!

1. Open a new transparent image
Open all of your supplies

2. C/P the frame of choice
Add drop shadow
Create a new raster layer behind the frame layer
C/P the tube of choice above the frame layer
Add drop shadow
C/P the winged bookplate
Add drop shadow
C/P the motorcycle
Add drop shadow

3. Using your lasso tool, trace along the open area of the frame
C/P the paper of choice INTO the selection
C/P the glitter splats behind all layers
Duplicate and mirror

Add copyright info and name and you are done!
This tutorial was written on Sept. 17, 2009 at 7:40 PM 
By Pimp'd Tagz

9.10.2009

Totally Awesome

 
 "Totally Awesome"
What you need:
Tube of choice, I used artwork by Jose Cano 
Scrapkit, "Her High School Years" By Sarah
Font of choice, I used TwinkleStarROB {A PTU font}
Graphic Program of choice, I used PSPX2
Let's Begin!
1. Open a transparent image 600x600
Open all of your supplies
2. C/P the frame of choice as a new layer
Add drop shadow
Create a new raster layer behind the frame layer
Using your selection tool, rectangle, trace along the open area of the frame
C/P the paper of choice into selection
3. Copy the tube layer you plan to use
Paste as a new image 1 to 2 times
You should have 3 tubes of the same 
Duplicate each tube
On each of the lower layers of each tube image
Go to Adjust>Blur>Gaussian Blur>"2" for the setting
For the top layer, go to the layers window to your right (typically)
Select the drop down menu and choose "screen"
For each tube image, repeat this
*You can play around with the different layer blend techniques
I used Screen, Multiply and Blur
I also changed the opacity of each tube image (top layer)
3. Once you have changed each tube image
C/P the tubes as shown above or however you wish
C/P any other elements of choice
I used word art and a stapled ribbon I turned black using the photo editing
Add Copyright Info and Name 
And you are done!!!
This tutorial was written on August 10th, 2009 at 10:15 PM by Pimp'd Designz

7.11.2009

Hot Blooded Woman


"Hot Blooded Woman"


What you need:


Tube of choice, I used artwork by Kieth Garvey
Scrapkit, "Tribal" by Sarah
Font, Kartika
EyeCandy 3 : Impact
Graphic Program of Choice, I use PSPX2


Let's Begin!


1. Open a transparent image, 600x600 pixels
Open all of your supplies


2. C/P the frame of choice
Add drop shadow
rotate 10 degrees to the left
Create a new raster layer behind the frame layer
Using your lasso tool, trace along the open area of the frame
C/P a paper of choice INSIDE the selection on the new raster layer


3. C/P tube of choice
add drop shadow
trim and re-size as needed
Merge the paper, frame and tube layers together
C/P the barb wire
Add drop shadow
C/P chrome frame as a new layer
add drop shadow
drag behind the frame/paper/tube layer
C/P the rope frame behind the flame layer
Add drop shadow
Merge all layers visible


4. Create a new raster layer
Go to your pre-vector shapes
Choose your eclipse shape
Drag the vector and position around the frame
Leaving just a little room around the whole thing
Highlight the new raster layer
Choose your font and type what I have or any word of choice
Add drop shadow
Delete the Vector layer
Merge all layers visible


5. Choose your font and make a large font size
I used 125 pixels
Add the Chrome effect and choose "Industrial Welding"
And these settings:
Bevel Width: 57.21
Bevel Height: 43
Smoothness: 99.49
Round Corners: 7
Or choose the settings of your liking
Open a new raster layer
Flood fill black or color of your choice
C/P the chrome lettering as a new selection onto the new image
Go to selection->modify->expand->4
Crop to selection
C/P onto your tag
Add drop shadow
Add copyright info and you are done!


This tutorial was written on July 11, 2009 at Midnight by Pimp'd Designz

4.08.2009

Elias Cool

"Elias Cool"

What you need:

Tube of choice, I am using artwork by Elais Chatzoudis (Lmt. Edition Tube) and you can purchase his work here
Scrapkit by me, Crazy*Cool, and you can purchase this kit here or here
Font of choice, I used Toonish
Graphic Program of choice, I use PSPX2

Let's Begin!

1. Open a transparent image 600x600 pixels
Open all of your supplies

2. C/P the frame of choice, I decided to go with the double frame.
Create a new raster layer behind the frame layer
Using your selection tool, rectangle, drag along the frame
C/P your paper of choice INTO selection
C/P the tube of choice, It's best to have one that is sitting or crawling
For the 3-D effect.
Postion the tube as needed
Duplicate the tube and drag one behind the frame layer
You should now have one above and one below the frame
Using your lasso tool, trim along the top layer of the tube,
Cutting the tube as needed to give it a 3-D look.
Add drop Shadow to the BOTTOM tube layer
C/P the second tube or close-up of tube in the frame
Add drop shadow
I decided to make this tube B&W

3.C/P any other elements, I used the beaded wire, a flower, a bow and the WA "Cool"
Add drop shadows as needed
Merge all layers visible
Re-size or trim down tag as needed
Add copyright info and name and you are done!

This tutorial was written on April 8th, 2009 at 1:00 PM by Pimp'd Tagz

Girls Rock

*This is an animated Tutorial, To View the animated tag click here*
"Girls Rock"

What you need:

Tube of choice, I am using artwork by Scott Blair and you can purchase his work here
Scrapkit by Candy Kisses Designs, "Glam Rock" and you can purchase her kit here
Mask of choice
Font of choice, I used Toonish (big surprise, I know)
Graphic Program of Choice, I use PSPX2
Animation Shop
Xenofex2: constellation
Basic knowledge of both programs

Let's Begin!

1. Open a transparent image 600x600 pixels
Open all of your supplies

2. C/P the ribbon/skull as a new layer
Add drop shadow
Apply your favorite mask to a paper of choice
C/P the masked paper behind the ribbon layer
C/P the diamond swirl as a new layer above the masked paper layer

3. C/P your tube of choice, re-size as needed
I choose to make my tube B&W
Add drop shadow
Duplicate tube and mirror image
C/P the "Girls Rock" banner as a new layer
Re-size as needed
Add drop shadow

4. Add your copyright info an name now if you do not know how to
add text to an animated tag
DO NOT MERGE LAYERS!

We will now begin applying the filter to the diamond swirl,
Creating each frame of the animation 1 at a time.

5. Highlight the diamond swirl
Go to your plug-ins and apply the Xenofex2:Constellation
To the diamond swirl
I used the Bling! Bling! setting, and star size to 12
Once you have done this the first time save image as frame 1
Hit the "Un-Do" arrow
Now repeat this step until you have at least 3 frames total.
Hit the "Random" button within the plug-in to change the speed without
Changing the settings.

6. Now open animation shop
Open your frames into the animation wizard
Hit play and if you are satisfied, save and you are done!

This tutorial was written on April 8th, 2009 at 12:30 AM by Pimp'd Tagz

4.06.2009

It's A Girl Thing

"It's A Girl Thing"

What you need:
Tube of choice, I used artwork by Elias Chatzoudis and you can purchase his work here
Scrapkit of choice, I used "Hope" By Scraps by Jessica and you can purchase her work here
Font of choice, I used Toonish
Mask of choice
Graphic program of choice, I use PSPX2

Let's Begin!

1. Open a transparent image 600x600 pixels
Open all of your supplies

2. C/P the film strip frame as a new layer
Create a new raster layer
Using you magic wand tool, select each inner area of the frame, one at a time
Go to selection->modify->expand->5
C/P the paper of choice into each selection
Add drop shadow to frame
C/P your tube of choice as a new layer above the paper layers
Add dtop shadow
Trim as needed

3. Apply mask to paper of choice
C/P the masked paper as a new layer behind the frame/paper layers
C/P the swirl as a new layer
Add drop shadow
C/P any other elements of choice
I used mascara, nail polish, flower, diva word art
Apply drop shadow as needed

Add copyright info and name and you are done!
This tutorial was written on April 6th, 2009 at 7:45 PM by Pimp'd Tagz

4.01.2009

Diva Attitude

"Diva Attitude"

What you need:
Tubes of choice, I used artwork by Keith Garvey and you can purchase his work here
Scrap kit by Twinky entitled "Diva with an Attitude" and you can purchase her kit here
Font of choice, I used Toonish
Graphic program of choice, I use PSPX2

Let's Begin!

1. Open a transparent image 500x500 pixels
Open all of your supplies

2. C/P her circle frame included in the kit
Add raster layer behind the frame layer
Using your magic wand tool select the open area inside the frame
Go to selections->modify->expand->8
C/P a paper of choice inside the selection on the new raster layer
C/P the film strip frame in her kit
Using your lasso tool, trace along the outer opening of the frames
Create a new raster layer behind the frame layer
C/P a paper of choice inside selection on the new raster layer

3. C/P the tubes similar to how I have above
Trim as needed
C/P the glitter lips and rotate 12 degrees to the right
Sharpen
Open the Word Art in her kit, same as above
Create a new image transparent and flood fill white
C/P the word art as a new selection
Go to selection->modify->expand->2
Crop to selection
C/P as a new layer and position it as I have above
Add drop shadow
Add your copyright info and name and you are done!

This tutorial was written on April 1st, 2009 at 1:00PM by Pimp'd Tagz

3.31.2009

I Rock


"I Rock"
*This is an animated Tutorial, click here for the animation*

What you need:
Tube of choice, I used artwork by Elias Chatzoudis and you can purchase his work here
Scrapkit of choice, I used "Rock Angel" and you can purchase this kit here
Font of choice, I used Aquarelle
Graphic Program of choice, I use PSPX2
Animation Shop

Let's Begin!

1. Open a transparent image 600x600 pixels
Open all of your supplies

2. C/P Frame of choice I choose the circle frame included with the kit
Create a new raster layer behind the frame layer
Using your magic wand tool select the area inside the frame
Go to selections->modify->expand->6
C/P paper of choice INSIDE of selection
C/P the star diamond line over paper
Duplicate 2 more times

3. C/P the glitter circle behind the frame/paper layer
C/P The chain link fence as a new layer
Rotate 12 degrees to the right
C/P the speaker included as a new layer
Add drop shadow
Place in a similar area as the tag above
C/P the spot light included in her kit
Add drop shadow
C/P any other elements you wish
I used the backstage pass as well
C/P the tube of choice
Add drop shadow
Add copyright info and name now if you can't add text to an animated tag

4. Merge all layers visible
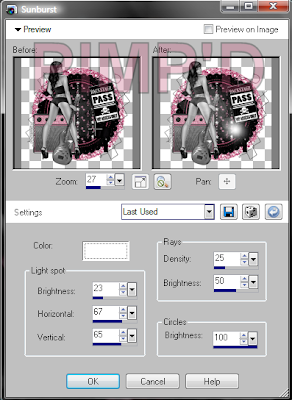
Go to Effects->Illumination Effects->SunburstsAbove are the settings I used
Once it's set, click OK
Save as frame 1
Click "Undo" and save as Frame 2
*Now Open Animation Shop*

5. Open animation wizard and choose your 2 frames
Your frame per second should be a high number, mine was set at 25
so it wasn't so fast. But use which ever speed you prefer.

And you are done!

This tutorial was written on March 31, 2009 at 11:15 PM by Pimp'd Tagz

Bad Diva

"Bad Diva"

What you need:
Tube of choice, I am using artwork by Keith Garvey and you can purchase his work here
Scrapkit of choice, I used "BAd Diva" by Gothic Inspirations and you can purchase her kit here
Font of choice, I used DB HeatherG
Graphic Program of choice

Let's Begin!

1. Open a transparent image 500x500 pixels
Open all of your supplies

2. C/P the frame of choice, I used her circle frame, and made it B&W
Duplicate 2 more times
Arrange in a similar formation as above
Using your magic wand tool, select the area inside 1st frame
Go to selections->modify->expand->6
Create a new raster layer behind that frame
C/P the paper of choice INSIDE the selection
DO NOT MERGE
Repeat for the 2 other frames

3. C/P tube of choice above one of the frame layers
Apply Photo Filters B&W if you wish
Trim as needed
Add drop shadow
Trim the tube and C/P it above in another frame, behind the frame layer
Add drop shadow

4. C/P the street sign included in her kit
Trim as needed
Add drop shadow
C/p any other elements, I used the barb wire, Pin Cluster and metal skull
Add drop shadows

Add copyright info and name and you are done!

This tutorial was written on March 31st, 2009 at 9:00PM by Pimp'd Tagz

3.28.2009

Lil Rocker

"Lil Rocker"

What you need:

Tube of choice, I am using artwork by Ismeal Rac and you can buy his work here
Scrapkit of choice, I am using Rock It! By me and you can purchase this kit here
Font of choice, I am using DJB Malea
Mask of choice
Graphic program of choice

Let's Begin!

1. Open a transparent image 600x600 pixels
Open all of your supplies

2. C/P frame of choice, I used the circle cardboard frame for the main one
Add drop shadow
Select the open area inside the frame using your magic wand tool
Go to selections->modify->expand->expand by 6
Create a new raster layer behind the frame layer
C/P paper of choice inside selection

3. Now, Open your star frame
Using your lasso tool, trace along the black cardboard star of this frame
Create a new raster layer and drag it behind the frame
C/P a second paper of choice INSIDE the selection
Merge all layers visible
C/P the star frame behind the paper frame of your main tag
Add drop shadow
Re-Position the star until it's similar to the tag above

4. C/P the rope circle as a new layer behind the star frame and re-position
Add drop shadow
C/P 2 flowers of choice
Re-size as needed
Sharpen if you do
Add drop shadow
C/P the tied tag as a new layer behind the flowers
Add drop shadow
C/P any other elements of choice
Add drop shadows
I used a guitar pick, cute skully, glitter lips
Be sure to sharpen after you re-size and/or rotate
Otherwise they become blurry
*To sharpen, go to Adjust->Sharpeness->Sharpen*

5. Add copyright info and name and you are done!

This tutorial was created on March 28, 2009 at 11:25AM by Pimp'd Tagz


2.18.2009

Girls Rock

"Girls Rock"

What You Need:

Tubes of choice, I used artwork by Keith Garvey and you can purchase his work here
Scrapkit of choice, I used "Torured Dreams" by Tammy and you can purchase her kit here
Font of choice, I used "2Peas Tasklist"
Graphic Program of Choice

Let's begin!

1. Open a new transparent image, 600x600
Flood fill if you wish
Create a new raster layer in your layer menu

2. C/P frame of choice
Add drop shadow
Using your selection tool, trace along the open area of the frame.
You may need to use your lasso tool, depending on the frame
Once you have done this for your frame(s), highlight the new raster layer
you created at the start
C/P the paper of choice inside each opening INTO selection
Do Not Merge
C/P your tubes of choice
add any photo filters you wish
Add drop shadows

3. Add any other elements of choice
Add drop shadow
Add copyright info and name and you are done!

This tutorial was written on 02-17-09 at 8:00pm by Pimp'd Tagz


2.04.2009

Envy


"Envy"
Things you will need:
Tubes of choice, I am using artwork by Simon Han and you can purchase his work here
Scrap kit of choice, I used "Esmerelda's Envy" By Simply Irresistible and you can purchase her kit here
Font of choice, I used Staccutto
Graphic Program Of Choice

Let's Begin!

1. Open a new transparent image 600x600
Flood fill if you wish
Create a new raster layer

2. C/P a frame of choice
Using your lasso tool, trace along the open area of the frame
C/P the paper of choice inside each selection
C/P each tube into the frame area

3. Add any other elements of choice
Add drop shadows
Add any saying you would like to add
Add copyright info and name and you are done!

This tutorial was written on 02-04-09 at 10:35 PM by Pimp'd tagz