
Video Tutorial (c) Pimp'd Designz
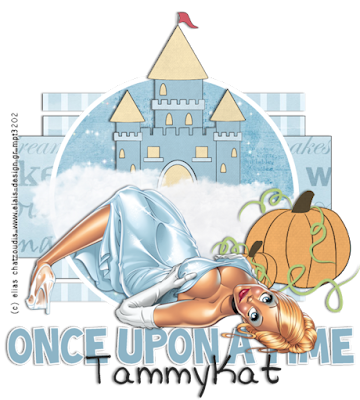
Artwork By Elias Chatzoudis and you can purchase his work here
Scrapkit, Ever After, By TammyKat and you can grab her kit here
Font Used : Toonish & TS-Traci-Hand
Graphic Program Used PSPX2
Tag Template # 44 by Sarah
(Her website is gone, please click here to download)
**********************************
**********************************
Download the FULL Size Video Here
Or View The YouTube version here
**************************************
Let's Begin!
1. Open a transparent image 600x600 pixels
Open all of your supplies
2. *For each layer of the template, you will need to C/P as a new selection,
Promote Background Layer and crop.
Then C/P to your tag image.
Please refer to the video for details.
Add drop shadow for each layer
3. C/P the castle somewhere in the center of the template
C/P the clouds and re-size as needed
C/P the tube of choice
Add drop shadow
C/P the pumpkins as a new layer behind the tube layer
Re-size as needed
Add drop shadow
4. Add any wording you'd like
Add name & Copyright info and you are done!
This tutorial was written on May 26, 2009 at 2:25 PM by Pimp'd Tagz
**The Videos Included may NOT be re-uploaded ANYWHERE**
Artwork By Elias Chatzoudis and you can purchase his work here
Scrapkit, Ever After, By TammyKat and you can grab her kit here
Font Used : Toonish & TS-Traci-Hand
Graphic Program Used PSPX2
Tag Template # 44 by Sarah
(Her website is gone, please click here to download)
**********************************
**********************************
Download the FULL Size Video Here
Or View The YouTube version here
**************************************

Let's Begin!
1. Open a transparent image 600x600 pixels
Open all of your supplies
2. *For each layer of the template, you will need to C/P as a new selection,
Promote Background Layer and crop.
Then C/P to your tag image.
Please refer to the video for details.
Add drop shadow for each layer
3. C/P the castle somewhere in the center of the template
C/P the clouds and re-size as needed
C/P the tube of choice
Add drop shadow
C/P the pumpkins as a new layer behind the tube layer
Re-size as needed
Add drop shadow
4. Add any wording you'd like
Add name & Copyright info and you are done!
This tutorial was written on May 26, 2009 at 2:25 PM by Pimp'd Tagz
**The Videos Included may NOT be re-uploaded ANYWHERE**