11.26.2013

How to use an overlay

How to use an Overlay in PSP.

Step One : Open your supplies and chose your paper color.

I decided on a single color for the paper to make it easier for you to see the difference in options. 

Step Two : Copy the overlay you'd like to use. I have supplied one for you at the end of this tutorial for you to use. It also has the images from this tutorial inside, so you can reference them at any time.


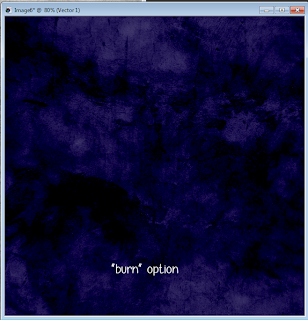
Step Three : Choose your blend options from the menu on the right. See below.

Click the image for a better view. But as you can see, there are several options. Most you won't want to use on papers. Below are some of the ones I use when creating papers.


Above are samples using the same overlay and the same base color.
It's also great to double up on overlays to gain a different texture.

It all depends on the colors, as wel. A darker base color will have a different effect. The same goes for different tones in the overlay. A light grey overlay will work best on darker colors. Using a lighter grey overlay on lighter colors will cause a "white wash" and bleach your base color, losing it's color tone.

I hope this helps. The same will work in PS, the "layer blending" menu will be located in your layer drop down menu.


10.01.2013

Halloween Postcard


"Halloween Postcard"

What you need:

Scrapkit of choice, I used "Boo-tiful" by Me which is available HERE

Font of choice, I used "Mad Beef"

Photograph of choice, I used my own of my daughter Emma from a couple Halloween's ago.

Let's Begin!

1. Open a new transparent image
Open all of your supplies

2. C/P the frame of choice as a new layer
Add drop shadow
Using your selection tool, rectangle, trace along the open area of the frame
Create a new raster layer behind the frame layer
C/P the paper of choice into selection
C/P the print of choice above the paper layer
Re-size as needed
Add drop shadow to the print

3. C/P the ribbon of choice above the frame layer
Re-size as needed
Add drop shadow
C/P the leaf of choice behind all layers
Rotate as needed
Sharpen image as needed
Add drop shadow
Duplicate and mirror
Merge both leaf layers together
Duplicate and flip
You should know have 4 leaves around the frame

4. C/P the photo of choice
re-size and rotate as needed
Add drop shadow
C/P the flower of choice above the photo layer
Re-size as needed
add drop shadow

Add any wording and your done!

This tutorial was written on October 1st, 2013 at 10:33 AM by Pimp'd Designz

Hallow Eve


"Hallow Eve"

Artwork by Kieth Garvey

Scrap Kit by Pimp'd Designz, "Boo-tiful" which is an
exclusive at Totally Sweet Designz.

Font of choice, I used "Mad Beef"

Graphic Program of choice, I use PSP X2

Let's Begin!

1. Open all of your supplies into PSP.

2. Create a new transparent image. I always start out with a 800x800
square image, just so I know I have enough room.

3. C/P the star frame from the kit. Resize as needed.
I resized mine at 60%.
Rotate slightly to the left.
Sharpen image.
Add drop shadow.
Create a new raster layer behind the frame layer.

2. Using your lasso tool, trace along the frame edge.
C/P the paper of choice into selection on the new raster
layer you created behind the frame.
Add drop shadow to the frame layer.

3. Choose a paper of your choice for the "circle".
Your circle size depends on your initial tag size.
You can resize this at anytime. 
Using your selection tool, circle, trace out a circle shape.
Go to Layers>Promote Background layer
Crop to selection.
Open a new raster image.
Flood fill white.
C/P the newly created circle onto the white filled image
as a new selection.
Go to Selection>modify>expand>4
Crop to selection.
C/P the circle behind the frame/paper layers.
Add drop shadow.
Repeat this step for the rounded rectangle.
*I didn't add a white border around mine, but you can if you wish.

4. C/P the tube of choice above all layers.
Resize as needed.
Add drop shadow.
Using your close up tube (if available), C/P the 
close up image above the paper layer within the frame
Re-Size as needed and trim around the frame so there isn't
anything hanging out.
I chose to make mine B&W.

5. C/P the spiderweb from the kit above the tube layer inside
the frame. 
Resize and trim as needed.
Add drop shadow.
C/P the crow from the kit above the frame layer.
Resize as needed.
Add drop shadow.
C/P the glitter splatter of choice behind all layers.
Resize as needed and place behind the star frame area
or where you'd like.

Add name and copyright info and your done!

This tutorial was written on October 1st, 2013 at 9:35 AM by Pimp'd Designz


12.10.2012

New Year


"New Year"

What you need:
Tube of choice, I used artwork by VeryMany

Scrapkit, "A New Year" by me

Font of choice, I used DJB ROOM MOTHER script

Graphic program of choice, I use PSPX2

Let's Begin!

1. Open a new transparent image
Open all of your supplies

2. C/P the frame of choice as a new layer
Add drop shadow
Create a new raster layer behind the frame layer 
Using your lasso tool, trace along the open area of the frame
C/P the paper of choice into selection
C/P the tube of choice above the frame layer
Trim as needed
Add drop shadow

3. C/P the greenery from the kit behind the paper/frame layer
Duplicate and rotate around the frame as desired
Add drop shadows to each layer
C/P the bottle above the frame layer
Re-size as needed
add drop shadow
C/P the glasses of choice
Add drop shadow
C/P balloons behind the tube layer
Re-Size as needed


Add copyright info and name and your done!

This tutorial was written on December 10th, 2012 at 2:09 PM by Pimp'd Designz

12.07.2012

Sweet Pole

"Sweet Pole"

What you need:

Tube of choice, I used artwork by Verymany

Scrapkit, "Holiday Hugs" by Pimp'd Designz (me)

Font of choice, I used Cheri

Graphic program of choice, I use PSPX2

Let's Begin!

1. Open a new transparent image
Open all of your supplies

2. C/P the frame of choice as a new layer
Create a new raster layer
Using your lasso tool, trace along the open area of the frame
C/P the paper of choice into selection
C/P the tube of choice above the paper layer
Re-Size and trim as needed
Add drop shadow
C/P the north pole above the frame layer
Add drop shadow
C/P the teddy bear from the kit
Re-Size as needed
Add drop shadow

3. C/P the candy cane heart above the frame layer
Rotate as needed
Add drop shadow
C/P the tree from the kit above the frame layer
Re-Size as needed
Add drop shadow

Add copyright info and name and your done!

This tutorial was written December 7th, 2012 at 11:38 PM